Time: Time Codes – Web
Table of Contents
- Navigate to Time Codes
- How to Create a New Time Code
- Manage Existing Time Codes
- How Time Codes are Selected on DSPTCH Mobile
Navigate to Time Codes
To navigate to the "Time Codes" page, start by clicking the "Time" tab from the primary navigation bar at the top of the screen. Then, click "Settings" from the sub-navigation bar. From the "Settings" page, click "Time Codes" from the menu bar on the left side of the page. This will open the time codes settings page.
See the video below for a demonstration:
How to Create a New Time Code
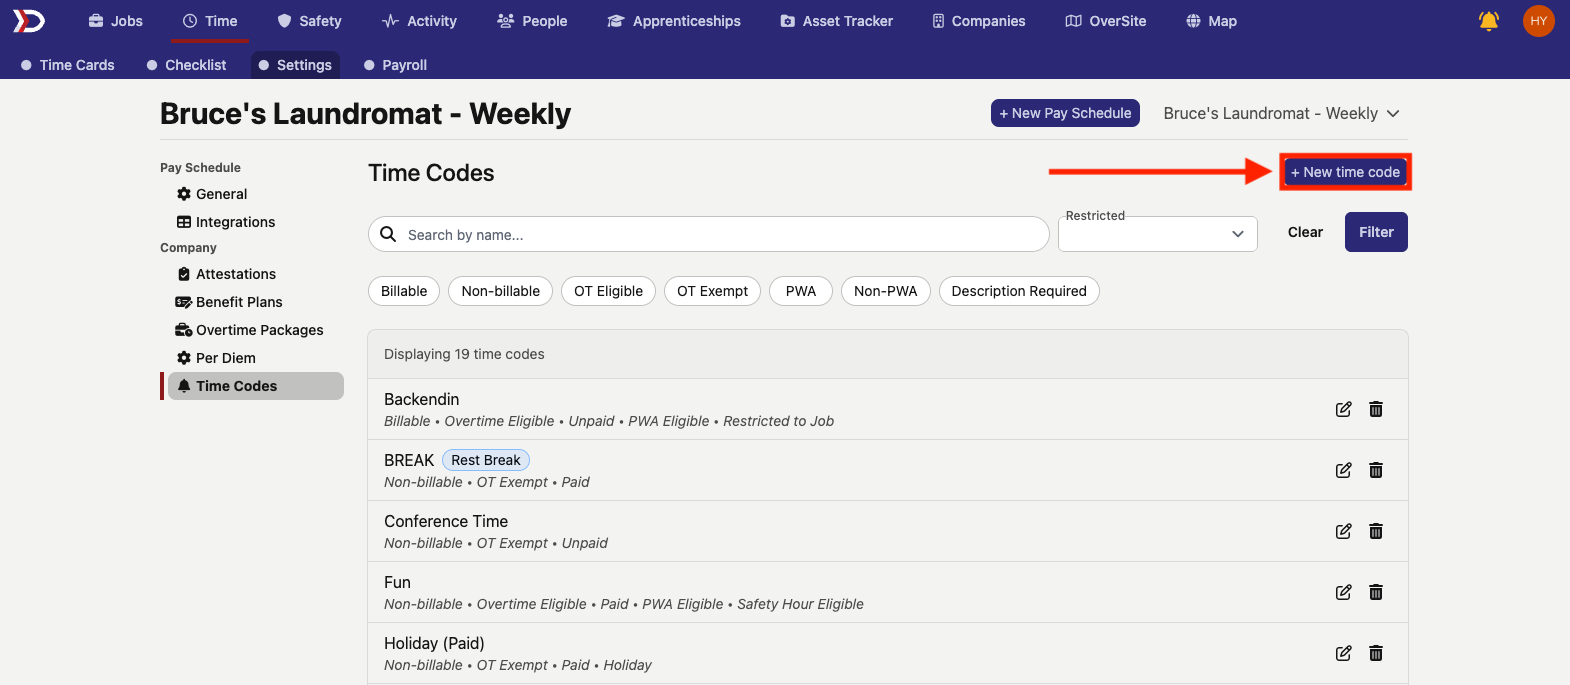
From the "Time Codes" page, click the "+ New Time Code" button (indicated by the red box and arrow in the image below). This will open the "New Time Code" form.
There are several fields in the "New Time Code" form that must be filled out.

- Name (Required)
- Provide a name for the time code. This will appear for technicians logging time on DSPTCH Mobile.
- Description (Optional)
- Provide a textual description of the time code.
- Classifications (Required)
- Billable: Toggle on if the time code is for billable hours.
- Overtime Eligible: Toggle on if the time code is for overtime eligible hours.
- Unpaid: Toggle on if the time code is for unpaid hours.
- PTO: Toggle on if the time code is for PTO hours.
- Holiday: Toggle on if the time code is for holiday hours.
- PWA Eligible: Toggle on if the time code is for PWA eligible hours.
- Safety Hour Eligible: Toggle on if the time code is for safety hour eligible hours (OSHA, OHSa, OHS, etc.)
- Shortcuts (Optional):
- Meal Break: Toggle on for technicians to have a one-click button available to start their meal break while they are logging time
- Rest Break: Toggle on for technicians to have a one-click button available to start a rest break while they are logging time
- Restriction (Optional):
- Restricted to Job Time Entries Option: Toggle on to require that time entries be tied to a job.
- Restricted to Non-Job Time Entries Option: Toggle on to require that time entires not be tied to a job.
- Restricted to Job that Has Time Code Option: Toggle on to require that time entry is tied to a job that explicitly allows this time code.
- Description Required Toggle (Optional):
- Toggle on to require that technicians must enter a description of their time entry to submit time.
After completing all required fields, click the "Save" button at the bottom right of the form to create the new time code.
Manage Existing Time Codes
Filtering Time Codes
At the top of the "Time Codes" page, there are several filter options. There is an option to search for time codes by name or filter by their classification status (see above for a detailed explanation on classification statuses).

Editing Time Codes
All time codes are editable at any time. To edit a time code, click the pencil icon to the right of the time code's name (indicated by the red box in the image below. This will open the "Edit Time Code" form, which contains the same fields as the "New Time Code" form. All fields are editable. For a detailed breakdown of each field, please see the list in the How to Create a New Time Code Section above.

As with the "New Time Code" form, when finished, click the "Save" button at the right of the form.
How Time Codes are Selected on DSPTCH Mobile
When technicians use DSPTCH Mobile to log time, they will be asked to select a time code for their time entry. All time codes that have been created using the methods detailed above will be listed as options.
Please see the video below for an example of how technicians can select a time code.

Viewing Time Codes for Time Entries on DSPTCH Web
The time code associated with a time entry will be visible on a worker's time profile on DSPTCH Web (highlighted in the red box in the image below):
