Company: Pay Settings Setup
Table of Contents:
After creating a company in DSPTCH and being assigned the Admin role for the company, configuring the company's payroll schedule and time codes in DSPTCH is required before employees can begin capturing time using the DSPTCH mobile app.
Company Settings to Configure:
- Pay Schedule (Required)
- Time Codes (Required)
- Per Diem (Optional)
Pay Schedule Overview
Pay schedules are the cadence of how often employees are paid for a particular time window. DSPTCH pay schedules should match your payroll system's pay schedules. After the pay schedule is set up, DSPTCH automatically creates time cards for each user enrolled in DSPTCH T&A. Each user's time card corresponds to the duration of the pay schedule. Within the time card, users record time entries.
Creating a New Pay Schedule
To create a new pay schedule, first navigate to the "Time" page from the primary navigation bar at the top of the page. Then, select "Settings" from the sub-navigation bar. Lastly, click on "+ New Pay Schedule" button at the top right of the page.
See video below for a demonstration:

Setting up your company's pay schedule will require the configuration of a few options (see below):

- Company
- Select your company.
- Currency (Required);
- Select the currency of the rates that will be used on the pay schedule.
- Rounding Interval (Required):
- From the dropdown menu, select if time entries should be rounded to the nearest 1 minute or 15 minute intervals.
- Payroll System (Optional):
- From the dropdown menu, select of which payroll system your company uses. This can be left blank if your payroll system does not appear in the list.
- Start Day of Week (Required):
- Select the day of the the week that a new pay period starts on.
- Start Date (Required):
- Select the initial date this pay schedule takes effect.
- Time Zone (Required):
- Select the time zone the pay schedule will be run in.
- Frequency (Required):
- Select how often payroll is run or how long your pay periods are. The current options are weekly and bi-weekly.
- If you need more options, please email help@dsptch.work to request them.
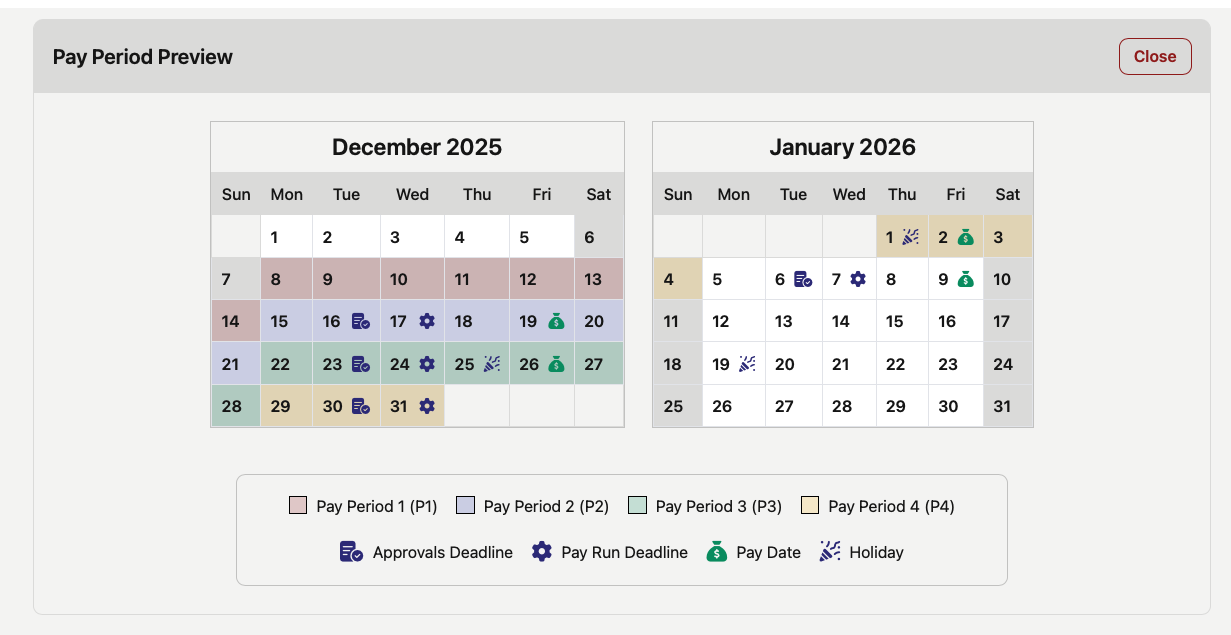
- Arrears Interval (Required):
- Select the number of days after the pay period in which employees are paid. This information is displayed on the "Time Cards" page.
- Pay Run Deadline Interval (Required)
- Select the number of days/hours that payroll must be run before payroll is paid out.
- Example: Payroll is paid out at 12pm CT on Fridays and the pay run deadline hypothetically needs to be 5pm CT on Thursdays. To set this correctly, enter 19 hours in this field.
- This information is displayed on the "Time Cards" page.
- Approvals Deadline Interval (Required)
- Select the number of days prior to the pay run deadline that time cards need to be approved.
- Example: The pay run deadline is 5pm CT on Thursdays and the approvals deadline hypothetically needs to be 5pm CT on Wednesdays. To set this correctly, enter 1 day in this field.
- This information is displayed on the "Time Cards" page.
- Time Card Auto Lock (Optional)
- Select the number of days after the pay run deadline that the time card will automatically lock.
- Leave this field bank to disable automatic locking.
- Paid after holiday (Required)
- In the instance when the pay date falls on a Federal Bank Holiday, is payroll ran before or after the holiday? Toggle On (Blue) for after Holiday, Toggle Off (Grey) for before Holiday.
Preview Time Cards
After setting up the company's pay schedule, there is an option to preview upcoming time cards to confirm the pay schedule has been configured correctly. To verify the configuration, press the "Preview" button. If the details are accurate, press "Save" to finalize the setup.
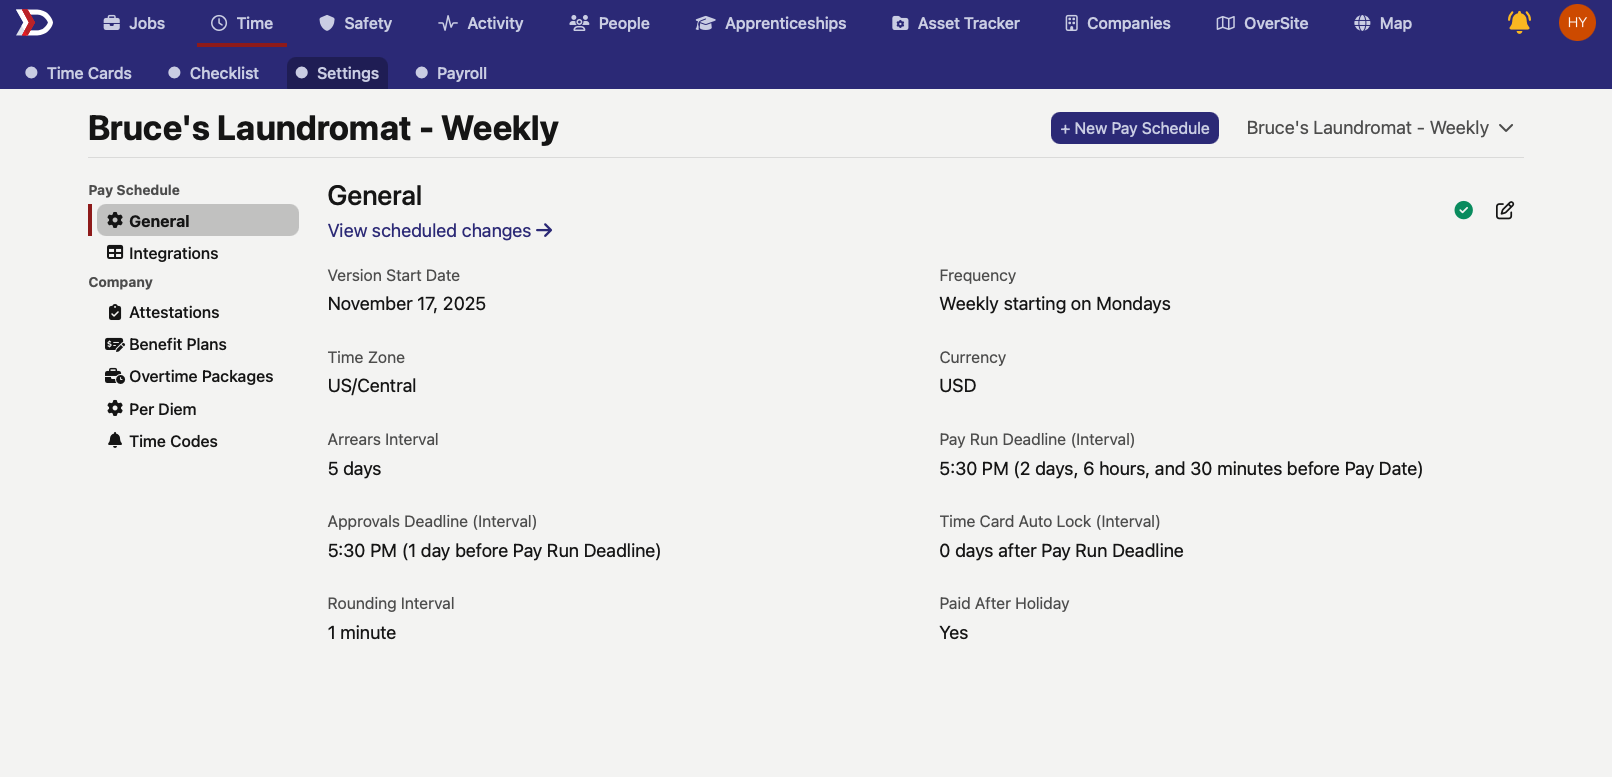
Viewing a saved Pay Schedule
After creating the pay schedule, it can be viewed under "Settings" tab within the "Time" tab. To navigate to the time settings, please review the previous instructions here. When a pay schedule is newly created, a process is initiated to generate all pay periods (time cards) for users in the company based on the pay schedule.
Creating Time Cards for all T&A Enrolled users can take a little bit of time!


✅ A green checkmark in the top right corner of the pay schedule indicates that all the pay periods have been created and users can begin logging time entries.
Editing Pay Periods
To edit a pay period, click the pencil button on the pay schedule (indicated by the red box and arrow in the image below):
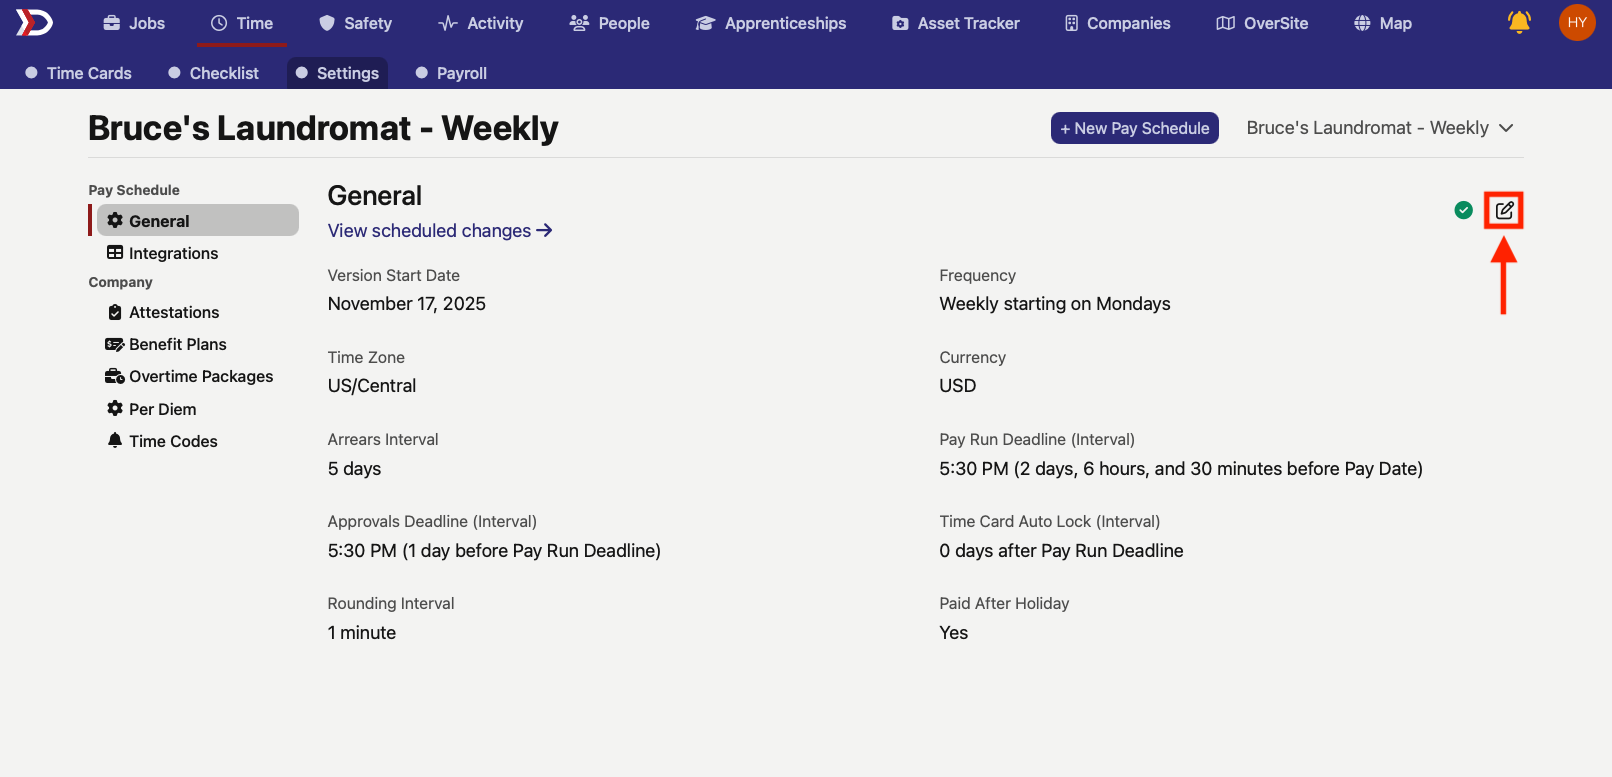
Make any necessary changes and hit the "Save" button when finished, or the "Cancel" button to discard the changes.
When making changes to a pay period, you will have to choose when said changes should go into effect.
Pay schedule changes must be assigned a future date that aligns with the schedule of your pay schedule.

Time Codes Setup
For a detailed breakdown of how to set up and manage time codes, please read our Time Codes – Web Help Doc.
Per Diem Setup
For a detailed breakdown of how to set up and manage per diems, please read our Per Diem - Web Help Doc.