Creating Custom Fields
Custom Fields can be created to track any data type not included in DSPTCH by default (e.g. Daily Headcount Limit for a job). This guide will provide an overview of how to create and use Custom Fields.
Table of Contents
Navigating to Custom Fields Settings
To navigate to the "Custom Fields" settings page, start by clicking on the profile icon in the top right of the screen. Then, select the "Settings" button from the dropdown menu. This will open the personal profile settings page by default. From the menu on the left side of the page, locate the "Company" section and click the "Custom Fields" button. This will open the "Custom Fields" settings page.
Please see the video below a for a demonstration:
Creating a New Custom Field
To create a new custom field, start by navigating to the "Custom Fields" settings page (instructions above). Then, click the "+ New Custom Field" button near the top right corner of the page.
This will open the "New Custom Field" form. There are several fields in the "New Custom Fields" form:

- Name (Required):
- The name of the custom field, which will appear on the "Custom Fields" settings page and be shown to users when they complete the field.
- Model Type (Required):
- A dropdown select between "Job," "Employment Details," and "Apprentice." This dictates where the custom field will be visible (for more information, read the Using Custom Fields Section below).
- Description (Optional):
- A textual description explaining the custom field.
- Enabled Toggle (Optional):
- Toggle on to enable the custom field (meaning Users can actively fill it out), or toggle off to disable the custom field from being visible.
After completing all fields, a success message will appear at the bottom right of the screen:

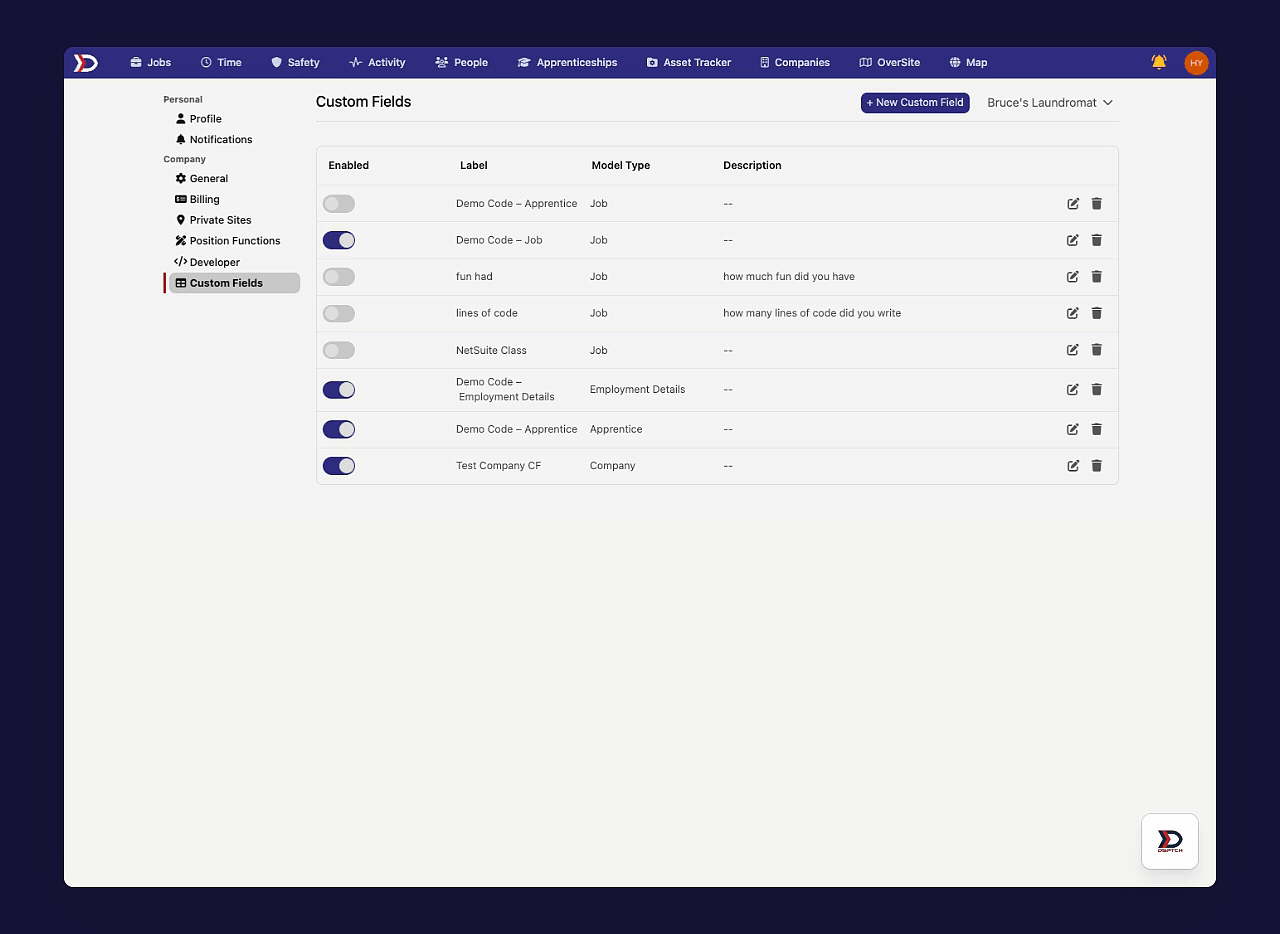
The new custom field will be added to the list on the "Custom Fields" settings page (indicated by the red box in the image below):

Using Custom Fields
The Model Type ("Job," "Employment Details," or "Apprentice") of a custom field dictates where it will be useable. This section of the guide will break down each of the three use cases.
"Job" Model Type Use Case
If the Model Type is set to "Job," the custom field will be used in the "Create Job" form. For a full breakdown on creating a job, please read our Creating a Job – Web Help Document.
The "Custom Fields" section is available at the bottom of the "Create Job" form. Adding a custom field to the "Create Job" form allows for capturing and tracking additional information that is not included in DSPTCH by default.
To add a custom field, open the dropdown and select the relevant custom field. The list of custom field options is the same as the custom fields that have been created in the "Custom Fields" settings page. After selecting the relevant custom field, enter information into the "Value" field. The "Value" field does not have a required format by design, as it allows you to store either textual/numeric information here.
See the video below for a demonstration:

After clicking the "Save," button the job will be created with the custom field data visible on the "Overview" tab (indicated by the red box and arrow in the image below):

"Employment Details" Model Type Use Case
If the Model Type is set to "Employment Details," the Custom Field will be used when creating a new user. For a full breakdown on creating a user, please read our Creating & Inviting Users – Web Help Document.
The "Custom Fields" section is available at the bottom of the "Create User" form. Adding a custom field to the "Create User" form allows for capturing tracking additional information that is not included in DSPTCH by default.
To add a custom field, open the dropdown and select the relevant Custom Field. The list of Custom field options is the same as the custom fields that have been created in the "Custom Fields" settings page. After selecting the relevant custom field, enter information into the "Value" field. The "Value" field does not have a required format by design, as it allows you to store either textual/numeric information here.
See video below for a demonstration:

"Apprentice" Model Type Use Case
If the Model Type is set to "Apprentice," the custom field will be used in the "Create Job" form. For a full breakdown on creating a job, please read our How to Create a New Apprentice Help Document.
The "Custom Fields" section is available at the bottom of the "New Apprentice" form. Adding a custom field to the "New Apprentice" form allows for capturing and tracking additional information that is not included in DSPTCH by default.
To add a custom field, open the dropdown and select the relevant custom field. The list of custom field options is the same as the custom fields that have been created in the custom fields settings page. After selecting the relevant custom field, enter information into the "Value" field. The "Value" field does not have a required format by design, as it allows you to store either textual/numeric information here.
See the video below for a demonstration:

After clicking the "Save" button, the apprentice will be created with the custom field data visible on their Profile tab (indicated by the red box and arrow in the image below):
