Users: User Profile Overview – Web
Table of Contents:
- Navigating to a User's Profile
- Overview of a User's Profile
- Editing an Existing User's Profile
- Editing User-Company Information
- How to Schedule a Wage Rate Change
- Granting / Removing Roles
- How to Terminate a User
- Groups Tab
- Positions Tab
- Time Cards Tab
- Certifications Tab
- Apprenticeship Tab
- Prevailing Wage Information Tab
- Assignments Tab
- Checklist Tab
Navigating to a User's Profile
To navigate to a User's Profile that needs to be edited, start by clicking the "People" tab from the main navigation bar at the top of the screen. Then search for the User by name in the search bar on the User's Page. Then, click on the User to open their Profile. See the video below for a demonstration:

Overview of a User's Profile
Personal Information
There are several Personal Information fields associated with a User's Profile:
- Work Email:
- The User's Work Email Address
- Personal Email:
- The User's Personal Email Address
- Phone Number:
- The User's Phone Number
- Device Info:
- The type of smartphone the User uses
- Location:
- The city the User resides in
- Birthday:
- The User's date of birth
- Winda ID:
- The User's Winda ID
- LinkedIn URL:
- The User's personal LinkedIn page URL
- DOL Apprentice #:
- The User's DOL Apprentice #
- DSPTCH ID:
- The User's unique DSPTCH IDEA
- Joined DSPTCH:
- The date which the User created their DSPTCH account
Identities
Identities are used to login to DSPTCH. These include the User's Phone Number(s), Work Email(s), Personal Email(s) (Note: If a User updates their Phone Number, Work Email, and/or Personal Email, both the old and updated phone/email will be associated with their account and can be used for login).

For example, this User has multiple identities (a Work Email, Phone Number, and Personal Email) that can all be used to login to their Account.
Editing an Existing User's Profile
How to Edit a User's Personal Information
From the User's Profile Page, click the "Edit" button to the right of the User's Full Name (highlighted in the red box in the image below):

Clicking "Edit" will open the Edit User Form. All fields in the form are editable. For a detailed breakdown of each field, please refer to our the "Create New Users Form" section of our Creating & Inviting User Help Document.

Once all necessary edits have been made, click "Save" to save the changes. The changes will be reflected on the User's Profile. See video below for an example of adding a LinkedIn URL to Cole's Profile.

Editing User-Company Information
How to Edit a User's Company Information
Start by navigating to the User's Profile that needs to be edited. Instructions can be found here.
Once the User's Profile is open, scroll down to the "Employment Details" Section.
From the "Employment Details" Section, click the three dots symbol at the top right of the section, and then click "Edit" from the dropdown that appears. This will open the Edit Employment Details Form. See video below for a demonstration:

There are several fields in the Edit Employment Details Form that can be changed at any time:
- Hire Date (Required):
- The date that the User was hired to your Company (in MM/DD/YYYY format).
- Employment Type (Required):
- Dropdown to select if the User is an Employee or Contractor for your Company.
- Manager (Optional):
- Dropdown to select the User's Manager from a list of all existing Managers in your Company.
- Payroll ID (Optional):
- An identification field that can be used to associate the new User with your payroll system.
- Enroll in T&A Toggle (Optional):
- Toggle on to enable Time & Attendance for the new User. Users enrolled in time and attendance will have time cards created automatically, and will have time card actuals synced (assuming your payroll system has been linked to DSPTCH – instructions here).
- Custom Fields (Optional):
- Custom fields are a way to store any information not offered by DSPTCH. Custom fields are created at the settings section of the app - check out our settings documentation to learn more.
How to Schedule a Wage Rate Change
Start by navigating to the User's Profile that needs to be edited. Instructions can be found here.
Once the User's Profile is open, scroll down to the "Employment Details" Section.
From the "Employment Details" Section, click the three dots symbol at the top right of the section, and then click "Schedule Pay Change" from the dropdown that appears. This will open the Schedule Pay Change Form. See video below for a demonstration:

How do scheduled changes work?
Overtime Eligibility and Prevailing Wage Changes
There are several fields in the Schedule Pay Change Form:
Basic Fields:
- Effective Date (Required):
- The Date (in MM/DD/YYYY format) that the Pay Change will take effect. All time entries prior to this effective date will be paid at the User's former hourly rate, and all time entries after this effective date will be paid at the User's new hourly rate.
- Hourly Rate (Optional):
- The New Hourly Pay Rate that the User will receive.
- Compensation Type (Optional):
- Dropdown to select if the new User is a salaried or hourly worker.
- Overtime Eligible Toggle (Optional):
- Toggle on to enable the new User to accrue overtime hours/compensation.
Prevailing Wage Details:
The following information is required when using DSPTCH's Prevailing Wage support.
These values are necessary to calculate a worker's fringe benefit rates, part of meeting the prevailing wage requirements of the Davis-Bacon Act, as referenced in the Inflation Reduction Act.
-
Annual Time Worked (Required):
- The annualized value for the number of hours the new User will work in a given year (not including overtime hours).
- Motivation: Per the Davis-Bacon and Related Acts, for each worker, all fringe benefits are annualized over the total hours worked over a year. Ensure these annualized values are representative.
- Annual PTO Hours (Required):
- The annualized value for the number of hours the new User will receive in PTO hours.
-
Motivation: Per the Department of Labor, PTO is considered a fringe benefit only if unused PTO is paid out.
Annual Holiday Time (Required): - The annualized value for the number of hours the new User will receive in Holiday hours.
- Motivation: Per the Department of Labor, holiday time is considered a fringe benefit only if unused holiday time is paid out.
- Annual Internal Training Time (Required):
- The annualized value for the number of hours the new User will spend in internal training during a given year.
- Motivation: Per the Davis-Bacon and Related Acts, when a worker is paid an hourly rate while in training, then the amount paid is considered fringe-eligible.
- Training Actual Amount (Required):
- The total amount paid in fringe-eligible expenses for the new User's training per year
- Motivation: Per the Davis-Bacon and Related Acts, the total amount paid for required training expenses such as instruction, books, tools, worker lodging, or materials is considered fringe-eligible. This should not include amounts paid to the worker as part of a training wage.
Once all required fields have been filled, click "Save" at the bottom right of the form to schedule the Pay Change (highlighted in red box in the image below):

Granting / Removing Roles
The Role(s) assigned to a new User will impact their permissions within DSPTCH. The Role selection form is a select all that apply, meaning that a new User can be granted the permission of more than one Role. The list below will provide a description of each Role and the accompanying permissions.
- Technician:
- The Technician Role allows the new User to be assigned to Jobs. This Role has the least amount of permissions.
- Field Lead:
- The Field Lead Role allows the new User to be assigned to Jobs and can view and edit non-sensitive Form Submissions and Definitions.
- Manager:
- The Manager Role allows the new User to be able edit all Jobs, Time Sheets, and non-sensitive Form Submissions and Definitions.
- Admin:
- The Admin Role allows the new User to be able edit all Jobs, Time Sheets, and non-sensitive Form Submissions and Definitions. Additionally, the Admin Role allows the new User to view Pay Data, edit Hourly Rates, Time Codes, Company Documents, and Company settings.
- Safety Manager:
- The Safety Manager Role allows the new User to be able to edit Sensitive Forms and receive Notifications for Safety Form Submissions. For a new User to be assigned the Safety Manager Role, it is required that they also have a Manager or Admin Role.
Removing a Role
To remove a Role, start by navigating to the User's Profile that needs to be edited. Instructions can be found here. Once the User's Profile is open, scroll down to the "Employment Details" Section.
From the "Employment Details" Section, locate the Roles list at the bottom of the box. Find the Role that needs to be removed from a User. Click the "X" button next to the Role. The Role will immediately disappear and the associated permissions will be removed from the User's Profile. See video below for a demonstration:

Granting a Role
To grant a Role, start by navigating to the User's Profile that needs to be edited. Instructions can be found here. Once the User's Profile is open, scroll down to the "Employment Details" Section.
From the "Employment Details" Section, locate the Roles list at the bottom of the box. Click the "+ Add Role" button and select the desired Role from the dropdown that opens. The Role will immediately be added to the User's Profile and the associated permissions will be granted. See video below for a demonstration:

How to Terminate a User
For detailed instructions on how to Terminate a User, please read our Terminating a User Help Document.
Groups Tab
The Groups Tab contains a list of all Groups that the User is a member in. See image below for an example:

For a detailed overview of Groups, including how to create and use Groups, please read our Groups – Web Help Document.
Positions Tab
The Positions Tab contains a list of all Positions that the User has been assigned to. See image below for an example:

For a detailed overview of Positions, including how to create and use Positions, please read our Jobs: Positions – Web Help Document.
Time Cards Tab
The Time Cards Tab contains a list of all Time Entries that the User has been clocked. See image below for an example:

Time Entires can be filtered by the Pay Period, Company, Manager Approval Status, and Worker Approval Status using the Filters at the top of the page (filters are highlighted in the red box in the image below for an example):

For a more detailed overview of Time Cards, such as how to create, view, and approve them, please read our Time – Web Help Document
Certifications Tab
The Certifications Tab contains a list of all Active, Archived, and Expired Certifications which the User possesses. See image below for an example:
To add a new Certification, click the "+ Add Certification" button at the top right of the screen (highlighted in the red box in the image above). This will open the Create New Certification Form (pictured below):
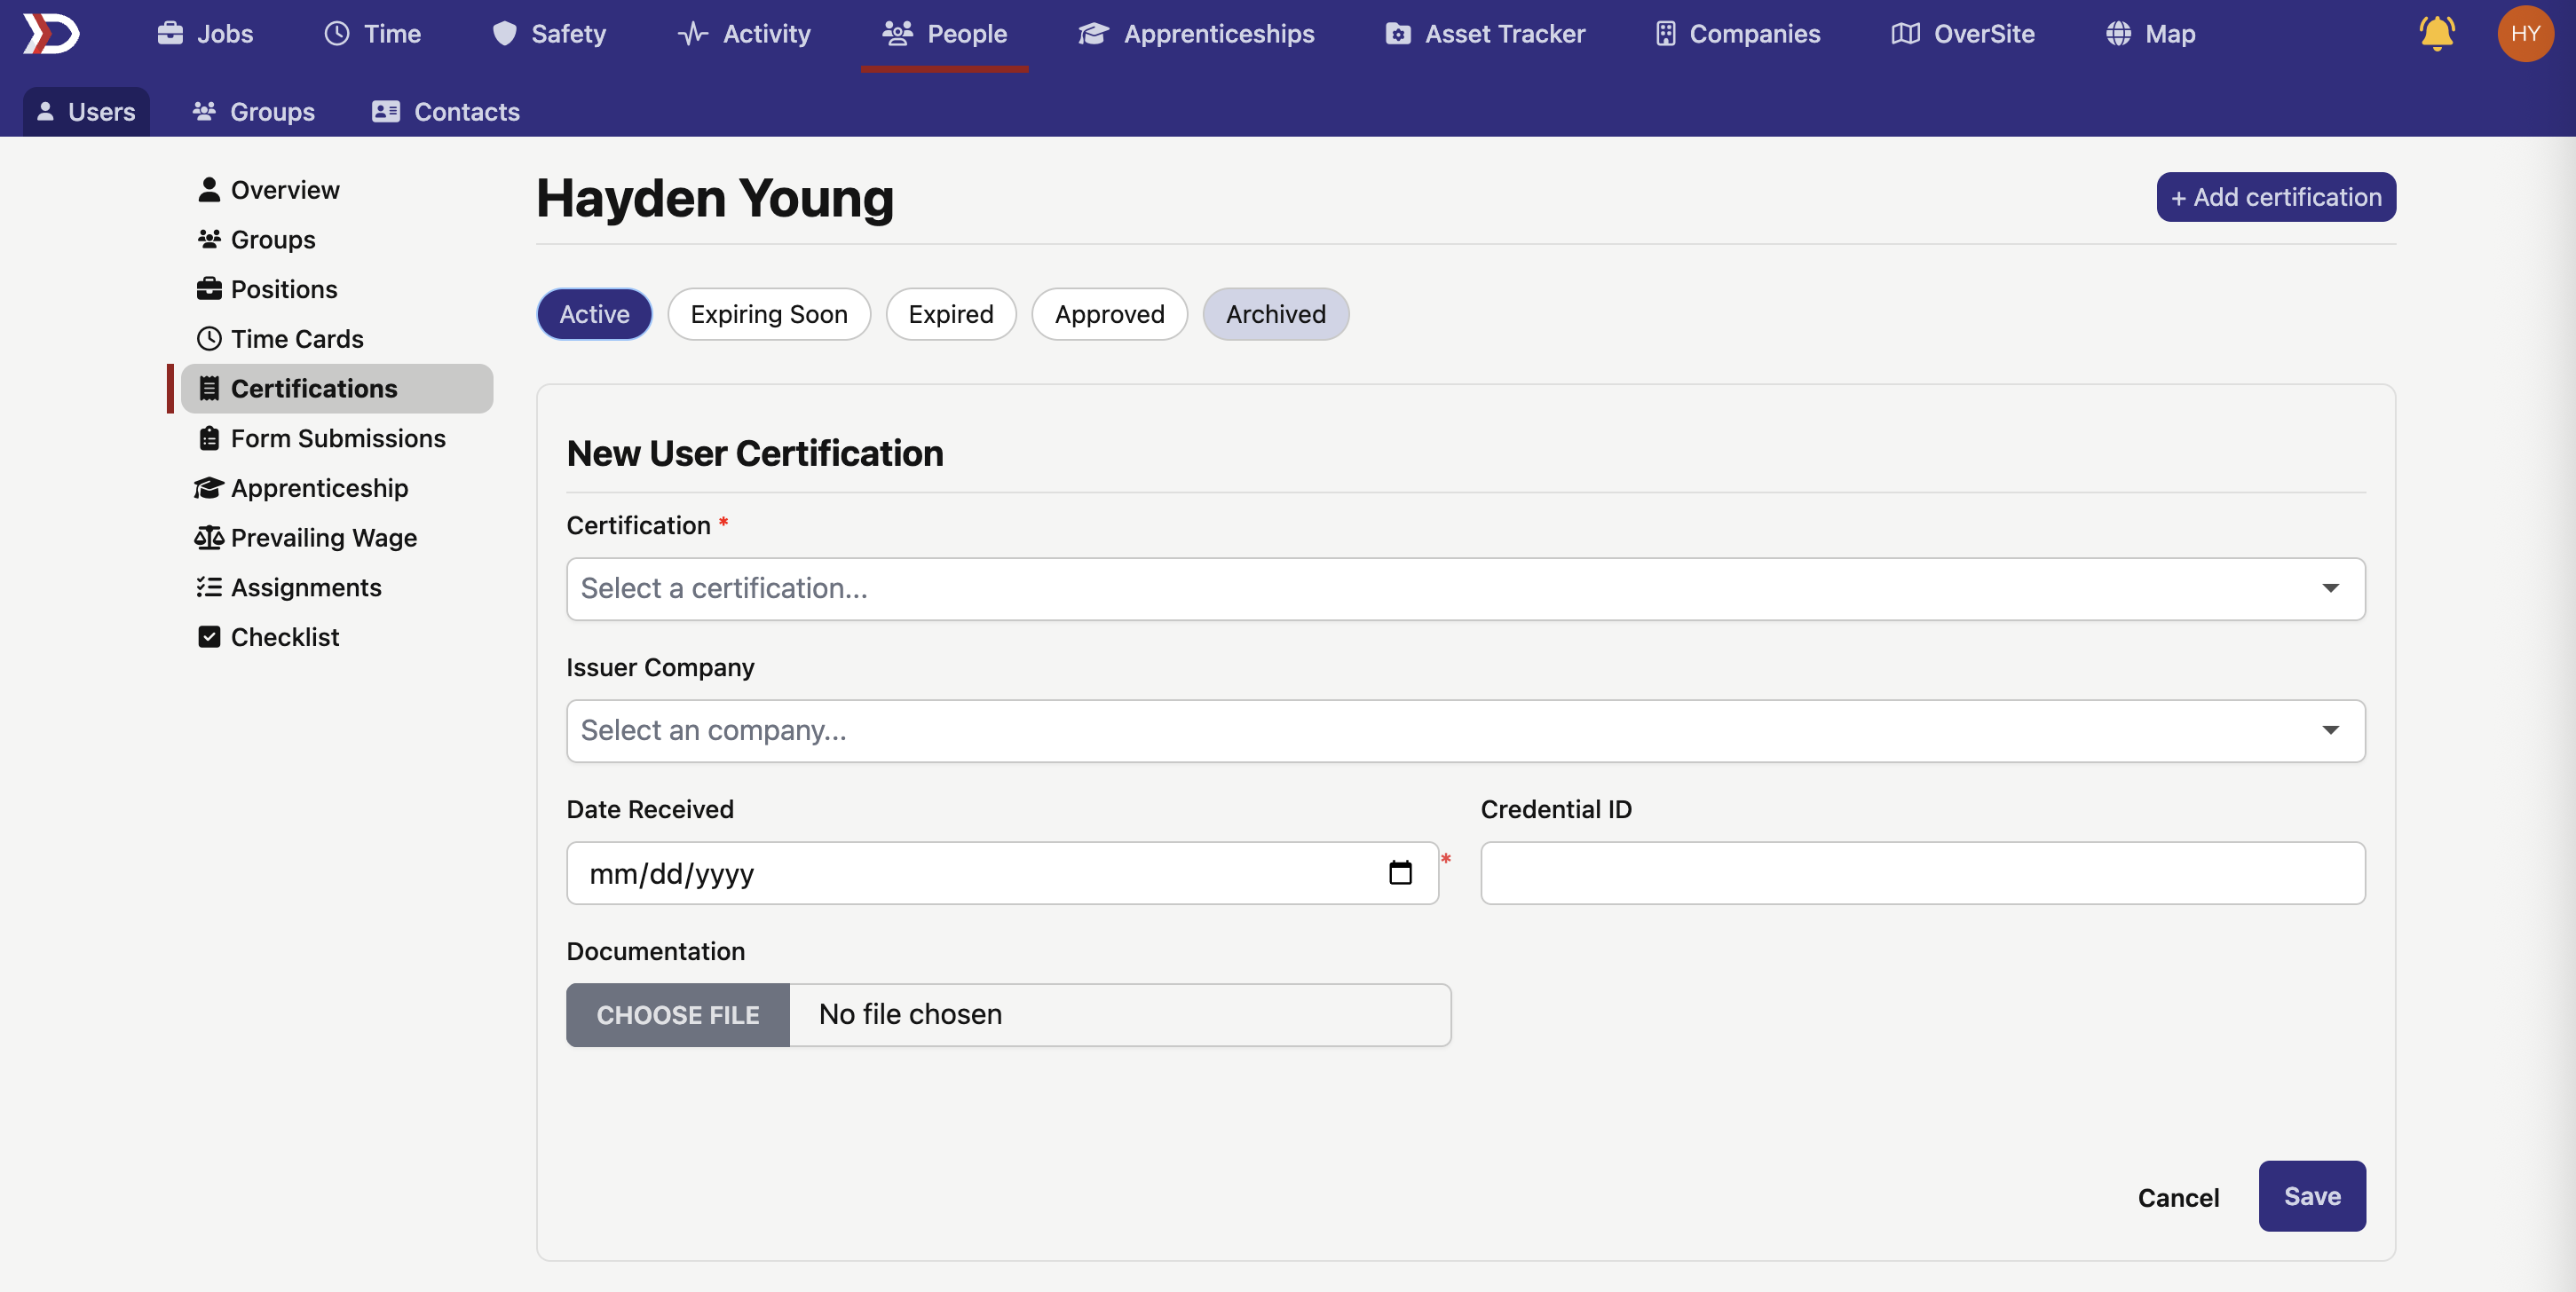
There are several fields in the Create New Certification Form:
- Certification (Required):
- The title of the Certification. Use the search bar to browse DSPTCH's comprehensive database of Certifications type.
- DSPTCH tries to keep up to date with all industry standard Certifications, but occasionally we miss some.
- If a certification is missing, please send an email to help@dsptch.work to request it be added.
- Issuer Company (Optional):
- The Company that issues the Certification.
- Credential (Optional):
- The Credential (such as a confirmation number) that confirms the authenticity of the Certification.
- Date Received (Optional):
- The Date (in MM/DD/YYYY format) which the Certification was received.
- NOTE: This should NOT be the date that the Certification was uploaded to DSPTCH
- File (Optional):
- A File upload for an image or PDF of the Certification.
For a detailed look at how Technicians can upload Certifications from DSPTCH Mobile, please read our Profile Certifications – Mobile Help Document.
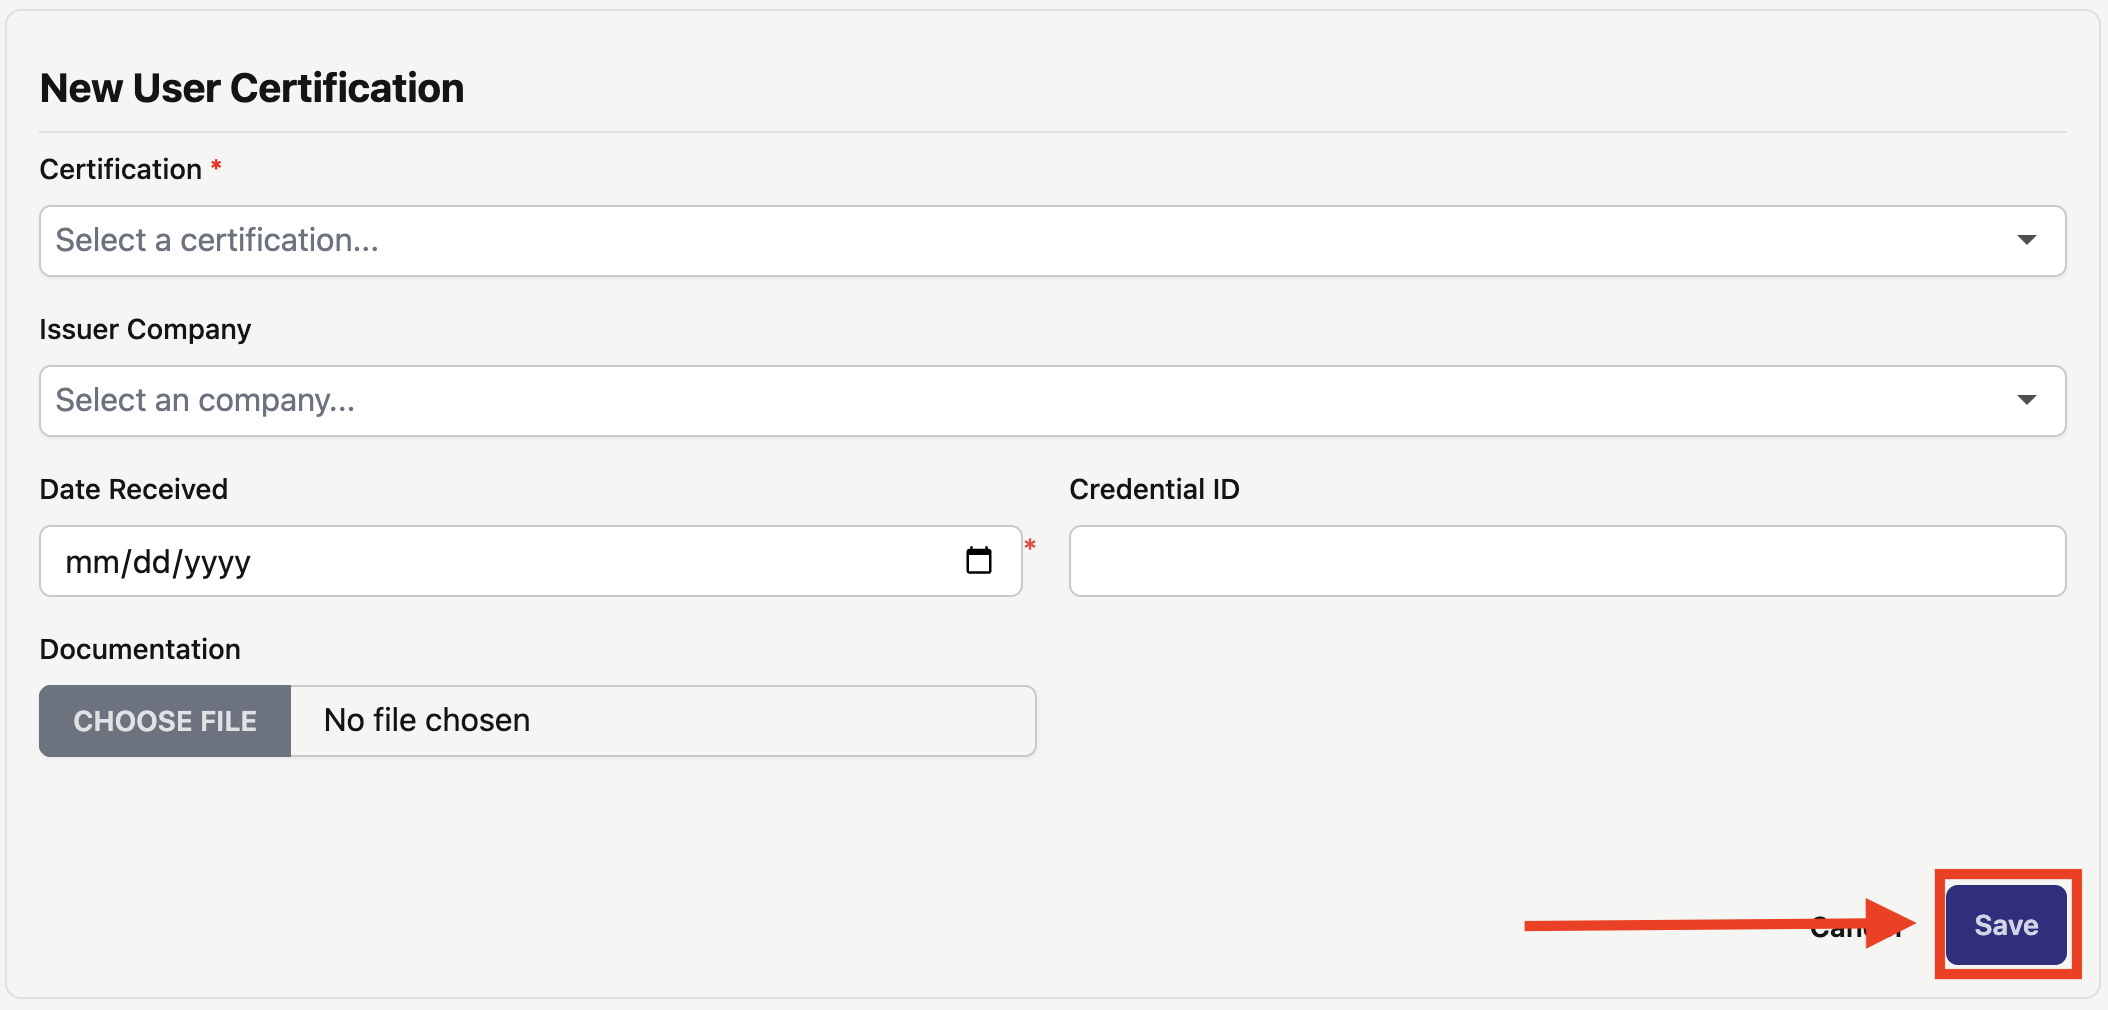
Once all fields have been filled out for the Create New Certification Form, click "Save" at the bottom right of the form (highlighted in the red box in the image below):
Apprenticeship Tab
If the User is registered to an Apprenticeship Program within your Company, their Apprentice Information will be available.

For more information on Apprentice Details, please read our Apprenticeships – Web Help Document.
Prevailing Wage Information Tab
The Prevailing Wage Information Tab houses information that will be used for the Prevailing Wage Compliance tools available in DSPTCH.
To add new information, click the "+ Add User Information" box (highlighted in the red box in the image below):

This will open the New User Information Form:

There are several fields in the New User Information Form:
- Address 1 (Optional):
- The Primary Address Line which the User lives at (e.g. 123 Main Street)
- Address 2 (Optional):
- The Secondary Address Line which the User lives at (e.g. Apt 12C)
- City (Optional):
- The City which the User lives in
- State (Optional):
- The State which the User lives in
- Zip Code (Optional):
- The Zip Code which the User resides in
- Social Security Number (Optional):
- The Social Security Number of the User
- Driver's License Number (Optional):
- The Driver's License Number of the User
- Driver's License State (Optional):
- The State which issued the User's Driver's License
- Local Business License (Optional):
- The Local Business License of the User
- Race (Optional):
- The Race of the User
- Sex (Optional):
- The Sex of the User
- Hispanic Origin (Optional):
- If the User is of South American, Central American, or other Spanish culture or origin regardless of race
- Veteran Status (Optional):
- The Veteran Status of the User
- Disability Status Toggle (Optional):
- The Disability Status of the User
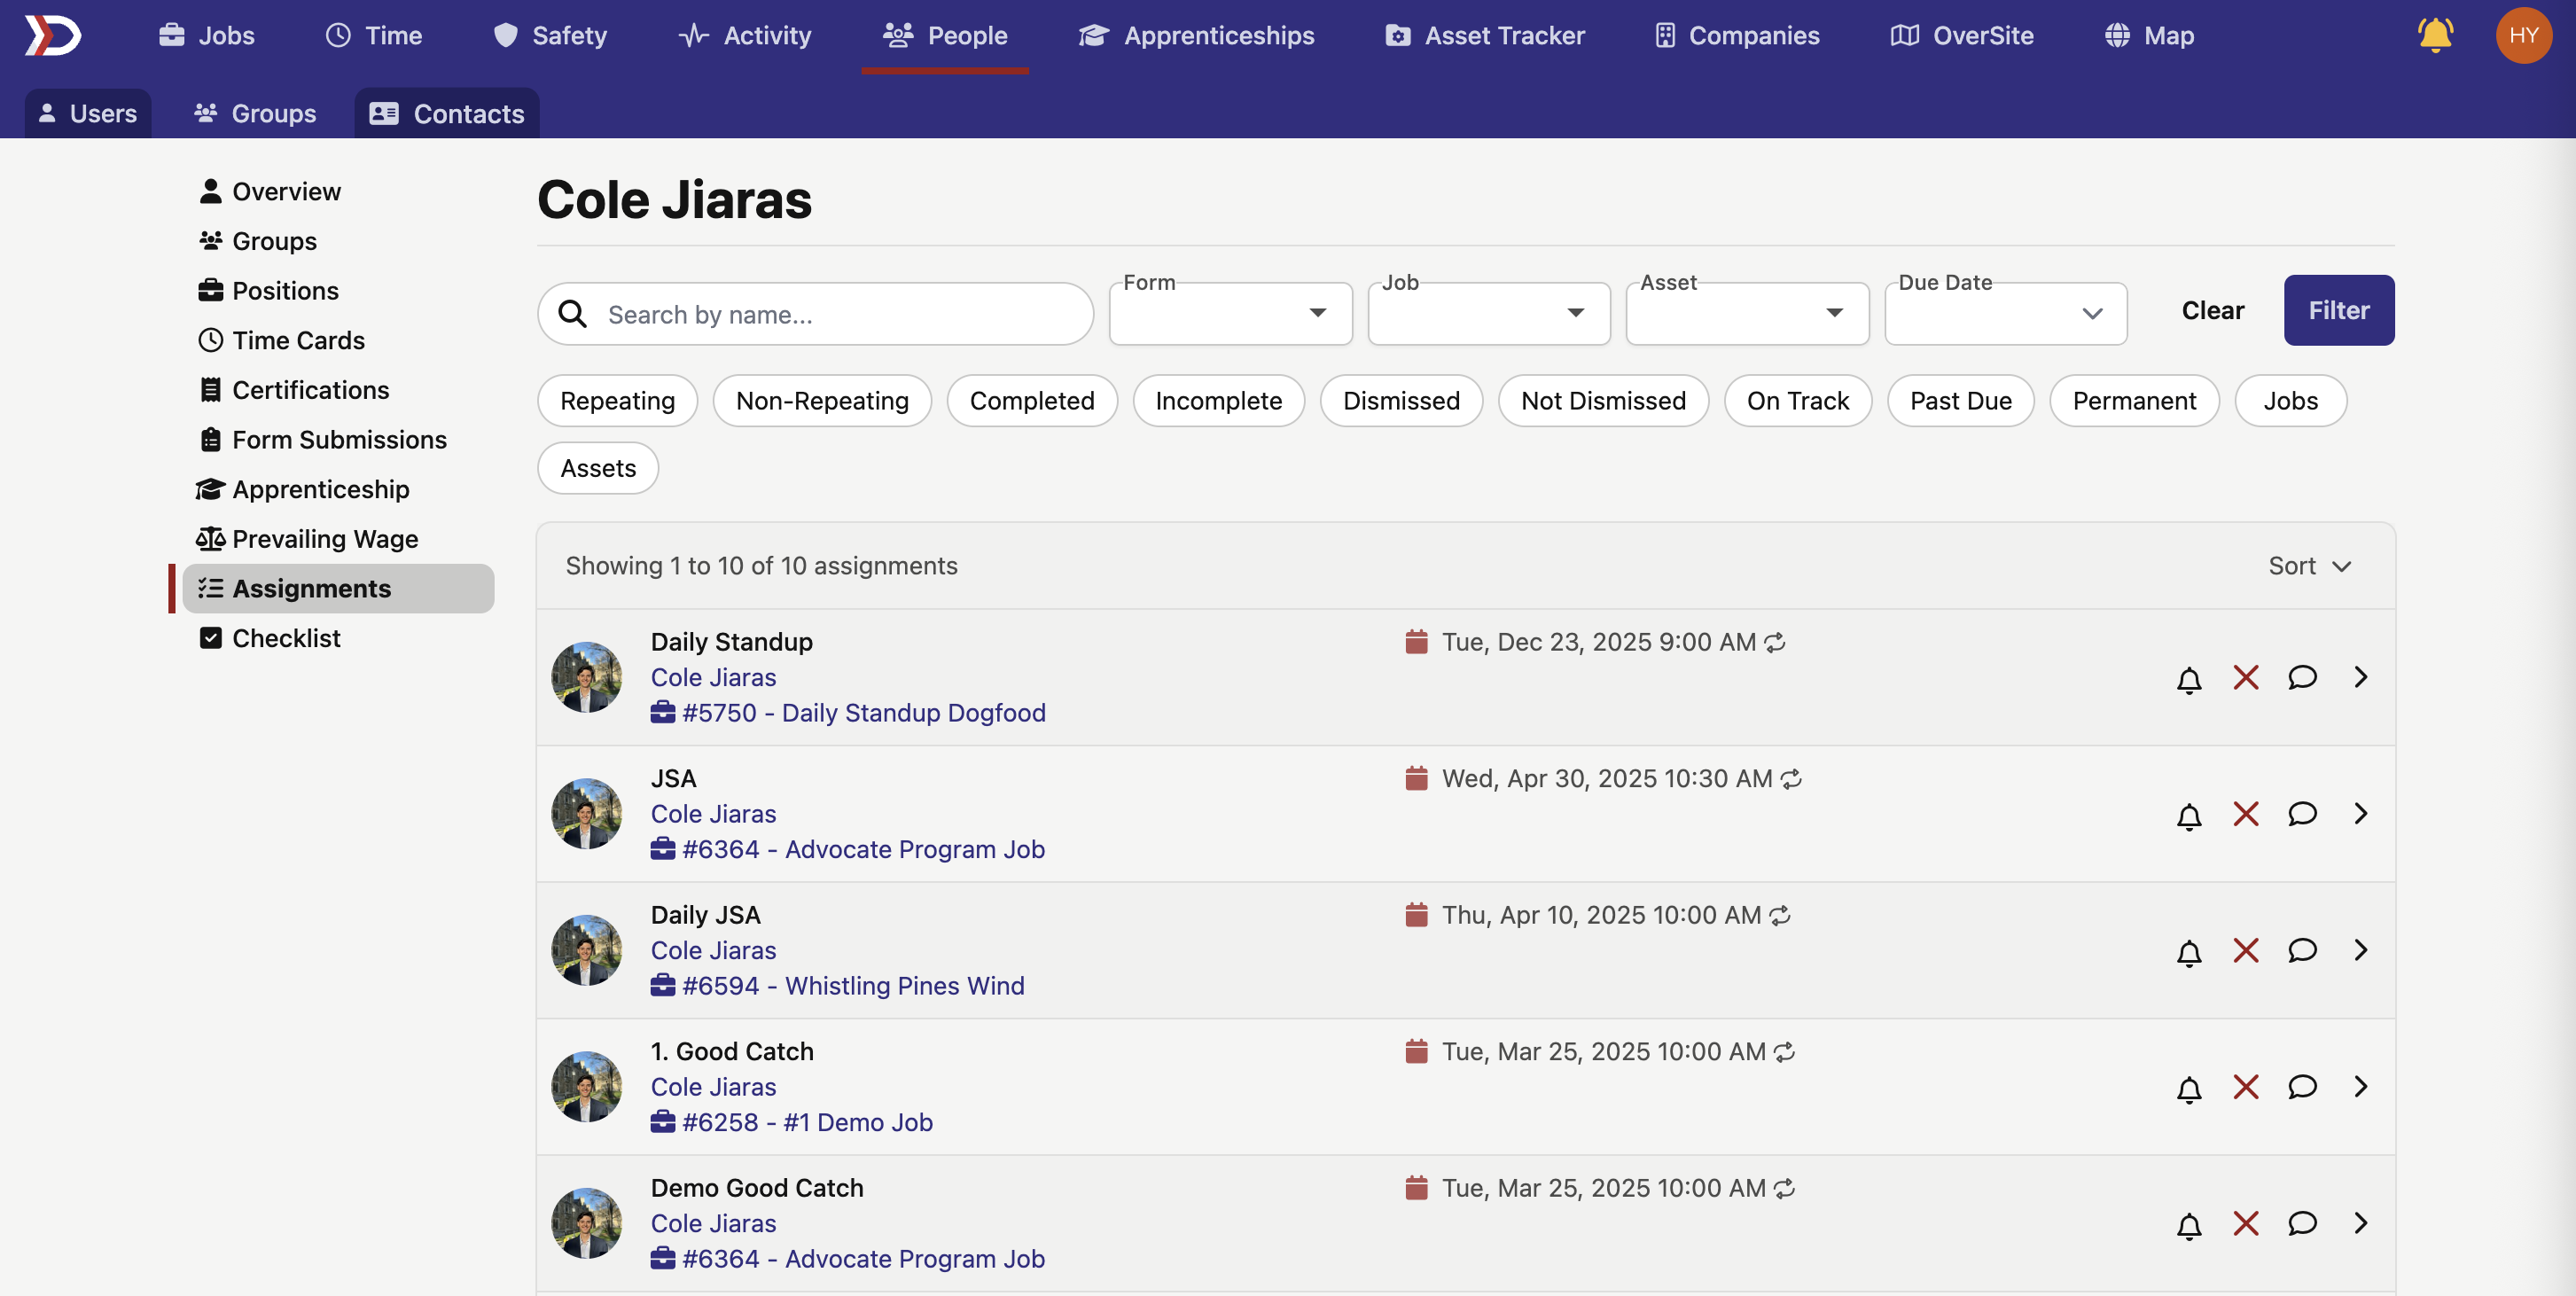
Assignments Tab
The Assignments Tab houses information regarding the user's assignments in DSPTCH. For more information on assignments in DSPTCH, please read our Assignments help document.
Checklist Tab
The Checklist Tab houses information regarding compliance checklist items that have been assigned to a specific user.
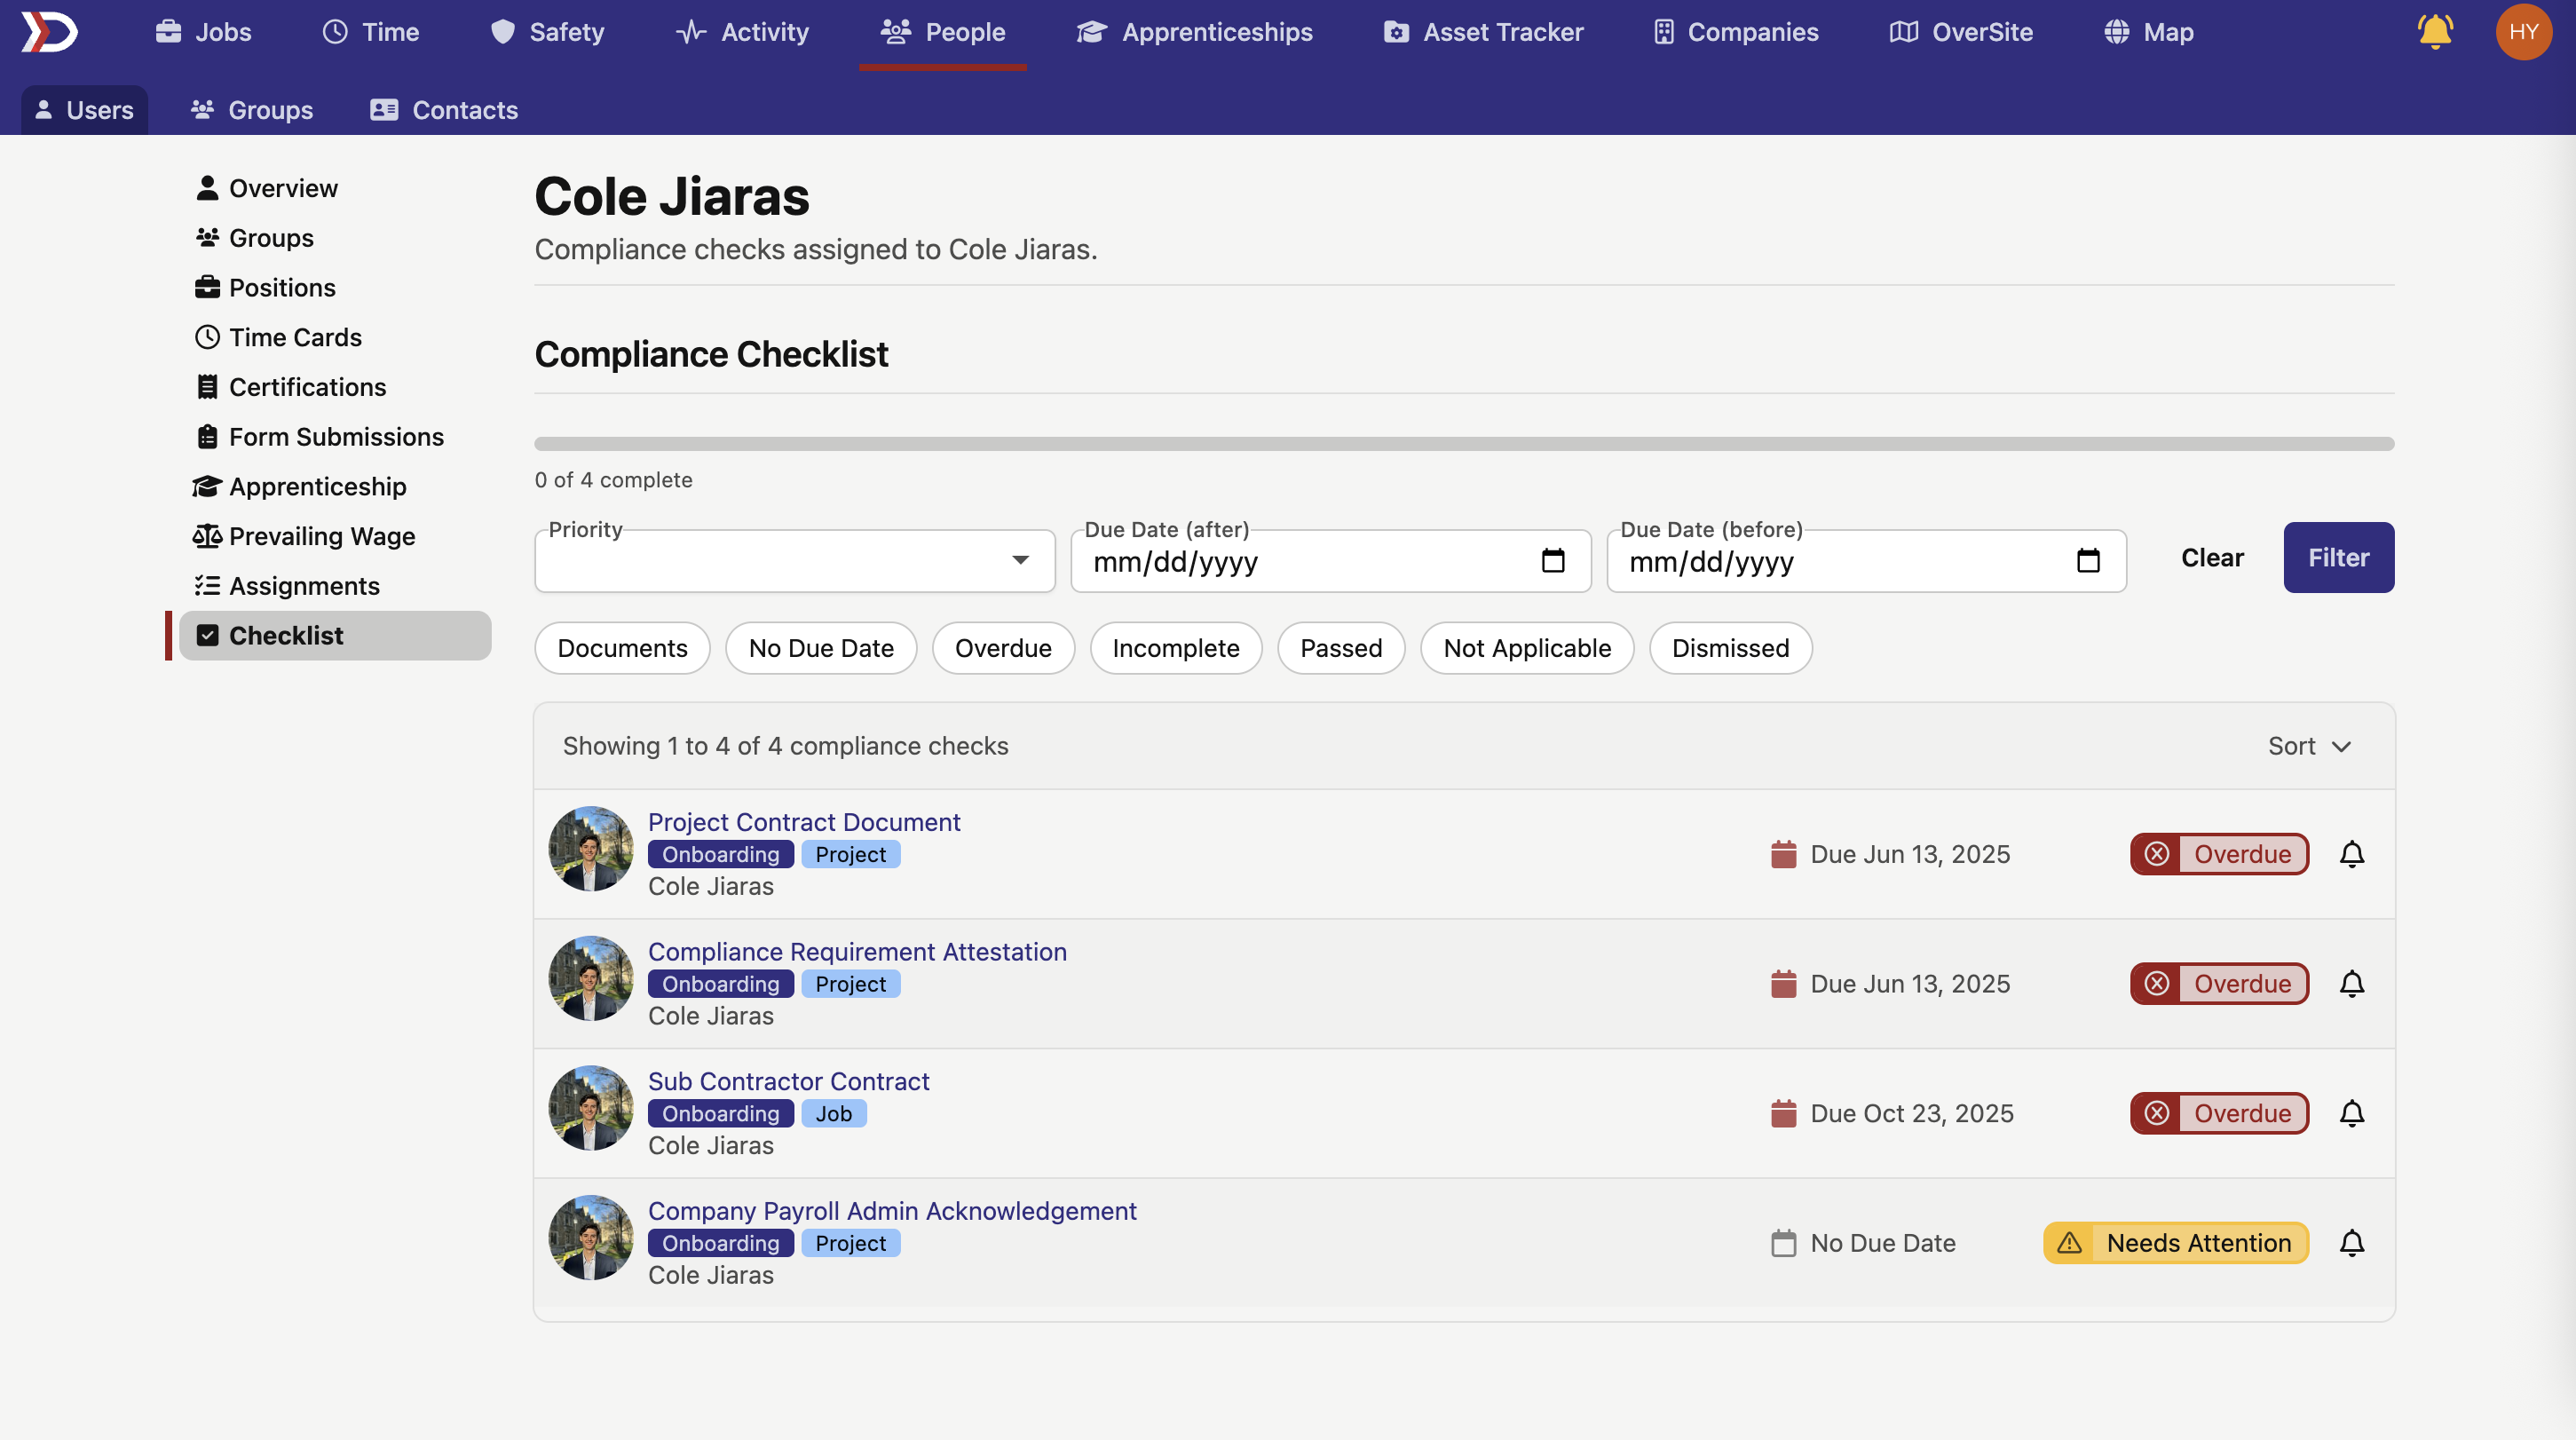
Checklist items can be filtered by these options
- Priority:
- Filters all items to display those that have been assigned a certain priority, which include Critical, High, Medium, and Low
- Due Date (after)
- Filters all items to display those that have a due date after a specified date
- Due Date (before)
- Filters all items to display those that have a due date before a specified date
- Documents:
- Items relating to required documents and forms
- No Due Date:
- Items that do not have a specific due date
- Overdue:
- Items that have a due date which has passed
- Incomplete:
- Items that have not been completed
- Passed:
- Items which have been completed
- Not Applicable:
- Items which have been marked as "Not Applicable"
- Dismissed:
- Items which have been dismissed
For more information on compliance checks, please read our Jobs Compliance Tab and Projects Compliance Tab help documents.